Difference between revisions of "Wildfly"
| (6 intermediate revisions by the same user not shown) | |||
| Line 8: | Line 8: | ||
| + | Sources and tools: | ||
| + | * Official JEE 7 examples: https://github.com/javaee-samples/javaee7-samples | ||
| + | * Maven archetype JEE + Arquillian: http://blog.arungupta.me/2014/06/testable-javaee7-maven-archetype-using-arquillian-techtip34/ | ||
| − | |||
| Line 19: | Line 21: | ||
Unzip it and launch the server in ''standalone'' mode: | Unzip it and launch the server in ''standalone'' mode: | ||
| + | |||
<syntaxhighlight lang="bash"> | <syntaxhighlight lang="bash"> | ||
$wildfly/bin/standalone.sh | $wildfly/bin/standalone.sh | ||
| Line 60: | Line 63: | ||
Relaunch the server: | Relaunch the server: | ||
<syntaxhighlight lang="bash"> | <syntaxhighlight lang="bash"> | ||
| + | # Stop server | ||
| + | $wildfly/bin/jboss-cli.sh --connect command=:shutdown | ||
| + | # start server | ||
$wildfly/bin/standalone.sh | $wildfly/bin/standalone.sh | ||
</syntaxhighlight> | </syntaxhighlight> | ||
| Line 140: | Line 146: | ||
| + | |||
| + | <syntaxhighlight lang="bash"> | ||
What type of user do you wish to add? | What type of user do you wish to add? | ||
| − | |||
a) Management User (mgmt-users.properties) | a) Management User (mgmt-users.properties) | ||
| − | |||
b) Application User (application-users.properties) | b) Application User (application-users.properties) | ||
| − | + | (a): a | |
| − | (a): | ||
Enter the details of the new user to add. | Enter the details of the new user to add. | ||
| − | |||
Using realm 'ManagementRealm' as discovered from the existing property files. | Using realm 'ManagementRealm' as discovered from the existing property files. | ||
| + | Username : admin | ||
| − | |||
The username 'admin' is easy to guess | The username 'admin' is easy to guess | ||
| − | + | Are you sure you want to add user 'admin' yes/no? yes | |
| − | Are you sure you want to add user 'admin' yes/no? | ||
Password recommendations are listed below. To modify these restrictions edit the add-user.properties configuration file. | Password recommendations are listed below. To modify these restrictions edit the add-user.properties configuration file. | ||
| − | |||
- The password should not be one of the following restricted values {root, admin, administrator} | - The password should not be one of the following restricted values {root, admin, administrator} | ||
| − | |||
- The password should contain at least 8 characters, 1 alphabetic character(s), 1 digit(s), 1 non-alphanumeric symbol(s) | - The password should contain at least 8 characters, 1 alphabetic character(s), 1 digit(s), 1 non-alphanumeric symbol(s) | ||
| − | |||
- The password should be different from the username | - The password should be different from the username | ||
| − | + | Password : secret | |
| − | Password : | ||
| Line 175: | Line 174: | ||
About to add user 'admin' for realm 'ManagementRealm' | About to add user 'admin' for realm 'ManagementRealm' | ||
| + | Is this correct yes/no? yes | ||
| − | |||
| + | Is this new user going to be used for one AS process to connect to another AS process? | ||
| + | e.g. for a slave host controller connecting to the master or for a Remoting connection for server to server EJB calls. | ||
| + | yes/no? no | ||
| + | </syntaxhighlight> | ||
| − | |||
| − | + | Now you can access the administrative pages: http://localhost:9990/ | |
| − | |||
| Line 203: | Line 204: | ||
$IPTABLES -A OUTPUT -p tcp --dport 9990 -j ACCEPT # Wildfly administration | $IPTABLES -A OUTPUT -p tcp --dport 9990 -j ACCEPT # Wildfly administration | ||
</syntaxhighlight> | </syntaxhighlight> | ||
| + | |||
| + | |||
| + | =Stop server (cmd line)= | ||
| + | |||
| + | <syntaxhighlight lang="bash"> | ||
| + | $wildfly/bin/jboss-cli.sh --connect command=:shutdown | ||
| + | </syntaxhighlight> | ||
| + | |||
| + | |||
| + | =Create datasource= | ||
| + | |||
| + | |||
| + | Source: http://www.techpaste.com/2014/05/08/how-to-configure-datasource-in-jboss-wildfly/ | ||
| + | |||
| + | Download the latest JDBC drivers: | ||
| + | * MySQL: http://dev.mysql.com/downloads/connector/j/ | ||
| + | * Postgresql: https://jdbc.postgresql.org | ||
| + | |||
| + | |||
| + | |||
| + | ==Register driver== | ||
| + | |||
| + | * Go to Runtime >> Server >> Manage Deployments | ||
| + | * Click on "''Add''" to deploy the MySQL driver. | ||
| + | |||
| + | [[File:Wildfly mysql datasource 01.png|700px|Wildfly driver registration]] | ||
| + | |||
| + | |||
| + | You must enable the driver. | ||
| + | * Select the new driver | ||
| + | * Click on "''En/Disable''" | ||
| + | |||
| + | |||
| + | [[File:Wildfly mysql datasource 02 driver enable.png|700px|Wildfly driver enable]] | ||
| + | |||
| + | |||
| + | Now the driver is ready to be used. | ||
| + | |||
| + | |||
| + | |||
| + | ==Create datasource== | ||
| + | |||
| + | * Go to Configuration >> Datasource >> Manage Deployments | ||
| + | * Click on "''Add''" to deploy the MySQL driver. | ||
| + | |||
| + | |||
| + | [[File:Wildfly mysql datasource 03 register new datasource.png|700px|Wildfly datasource menu]] | ||
| + | |||
| + | |||
| + | Fill up the form like this: | ||
| + | |||
| + | |||
| + | [[File:Wildfly mysql datasource 04.png|500px|Wildfly datasource creation 1/3]] | ||
| + | |||
| + | >> JNDI name must be: '''java:/jbdc/'''''datasourceName'' | ||
| + | |||
| + | |||
| + | [[File:Wildfly mysql datasource 05.png|500px|Wildfly datasource creation 2/3]] | ||
| + | |||
| + | >> You must use ''com.mysql.jdbc.'''''Driver'''_x_y | ||
| + | |||
| + | |||
| + | [[File:Wildfly mysql datasource 06.png|500px|Wildfly datasource creation 3/3]] | ||
| + | |||
| + | * Connection URL: '''jdbc:mysql://'''localhost:3306/AppDS | ||
| + | * Username: ''db_user'' | ||
| + | * Password: ''secret'' | ||
| + | |||
| + | Don't forget to adjust the server, database & user names. | ||
| + | |||
| + | |||
| + | Now you can enable the datasource: | ||
| + | |||
| + | [[File:Wildfly mysql datasource 07.png|500px|Wildfly datasource enable]] | ||
Latest revision as of 21:19, 24 April 2015
JBOSS Wildfly is an application server fully compatible with the JEE standard, like Glassfish.
- Official website: http://wildfly.org/
- Download: http://www.wildfly.org/downloads/
- Documentation: https://docs.jboss.org/author/display/WFLY8/Getting+Started+Guide
Sources and tools:
- Official JEE 7 examples: https://github.com/javaee-samples/javaee7-samples
- Maven archetype JEE + Arquillian: http://blog.arungupta.me/2014/06/testable-javaee7-maven-archetype-using-arquillian-techtip34/
Contents
Get Wildfly
Download latest Wildfly server: http://wildfly.org/downloads/
Unzip it and launch the server in standalone mode:
$wildfly/bin/standalone.sh
You can test the server on http://localhost:8080
Enable remote access
By default you can only access your server locally. You need to adjust the binding interface and hostname.
Quick settings
Since there are a lot of files to edit you can use sed. See below for detail explanations.
## Adjust binding
# replace '172.16.100.61' by your own IP @
#
sed 's/127.0.0.1/172.16.100.61/g' -i $wildfly/domain/configuration/host.xml
sed 's/127.0.0.1/172.16.100.61/g' -i $wildfly/standalone/configuration/standalone.xml
sed 's/127.0.0.1/172.16.100.61/g' -i $wildfly/standalone/configuration/standalone-ha.xml
sed 's/127.0.0.1/172.16.100.61/g' -i $wildfly/standalone/configuration/standalone-full.xml
sed 's/127.0.0.1/172.16.100.61/g' -i $wildfly/standalone/configuration/standalone-full-ha.xml

## Adjust hostname
# replace 'myServer' by your real server name (FQDN)
#
sed 's/localhost/myServer/g' -i $wildfly/domain/configuration/host.xml
sed 's/localhost/myServer/g' -i $wildfly/standalone/configuration/standalone.xml
sed 's/localhost/myServer/g' -i $wildfly/standalone/configuration/standalone-ha.xml
sed 's/localhost/myServer/g' -i $wildfly/standalone/configuration/standalone-full.xml
sed 's/localhost/myServer/g' -i $wildfly/standalone/configuration/standalone-full-ha.xml
Relaunch the server:
# Stop server
$wildfly/bin/jboss-cli.sh --connect command=:shutdown
# start server
$wildfly/bin/standalone.sh
You should see the following logs:
...
Undertow HTTP listener default listening on /172.16.100.61:8080
...
Http management interface listening on http://172.16.100.61:9990/management
Admin console listening on http://172.16.100.61:9990
...
Manual settings
Bind interface
Edit your configuration file
vim $wildfly/domain/configuration/host.xml
Adjust the bindings:
<interfaces>
   <interface name="management">
       <inet-address value="${jboss.bind.address.management:127.0.0.1}"/>
   </interface>
   <interface name="public">
       <inet-address value="${jboss.bind.address:127.0.0.1}"/>
   </interface>
   <interface name="unsecure">
        <!-- Used for IIOP sockets in the standard configuration. To secure JacORB you need to setup SSL -->
        <inet-address value="${jboss.bind.address.unsecure:127.0.0.1}"/>
   </interface>
</interfaces>
Replace 127.0.0.1 by the IP you'd like to use, ex: 192.168.1.100.
Set hostname
Edit your configuration file
vim $wildfly/standalone/configuration/standalone.xml
Adjust the hostname:
<host name="default-host" alias="localhost">
     ....
</host>
replace localhost by your server name (FQDN), ex: nuc-media-center.daxiongmao.eu
Create administrative users
There is no users by default. You must create one.
Launch the creation script:
$wildfly/bin/add-user.sh
What type of user do you wish to add?
 a) Management User (mgmt-users.properties)
 b) Application User (application-users.properties)
(a): a


Enter the details of the new user to add.
Using realm 'ManagementRealm' as discovered from the existing property files.
Username : admin


The username 'admin' is easy to guess
Are you sure you want to add user 'admin' yes/no? yes


Password recommendations are listed below. To modify these restrictions edit the add-user.properties configuration file.
 - The password should not be one of the following restricted values {root, admin, administrator}
 - The password should contain at least 8 characters, 1 alphabetic character(s), 1 digit(s), 1 non-alphanumeric symbol(s)
 - The password should be different from the username
Password : secret


What groups do you want this user to belong to? (Please enter a comma separated list, or leave blank for none)[  ]:


About to add user 'admin' for realm 'ManagementRealm'
Is this correct yes/no? yes


Is this new user going to be used for one AS process to connect to another AS process?
e.g. for a slave host controller connecting to the master or for a Remoting connection for server to server EJB calls.
yes/no? no
Now you can access the administrative pages: http://localhost:9990/
Firewall
Edit your firewall configuration and add:
##### Input
$IPTABLES -A INPUT -p tcp --dport 8080 -j ACCEPT   # HTTP alt.
$IPTABLES -A INPUT -p tcp --dport 8443 -j ACCEPT   # HTTPS alt.
$IPTABLES -A INPUT -p tcp --dport 9990 -j ACCEPT   # Wildfly administration


##### Output
$IPTABLES -A OUTPUT -p tcp --dport 8080 -j ACCEPT   # HTTP alt.
$IPTABLES -A OUTPUT -p tcp --dport 8443 -j ACCEPT   # HTTPS alt.
$IPTABLES -A OUTPUT -p tcp --dport 9990 -j ACCEPT   # Wildfly administration
Stop server (cmd line)
$wildfly/bin/jboss-cli.sh --connect command=:shutdown
Create datasource
Source: http://www.techpaste.com/2014/05/08/how-to-configure-datasource-in-jboss-wildfly/
Download the latest JDBC drivers:
- MySQL: http://dev.mysql.com/downloads/connector/j/
- Postgresql: https://jdbc.postgresql.org
Register driver
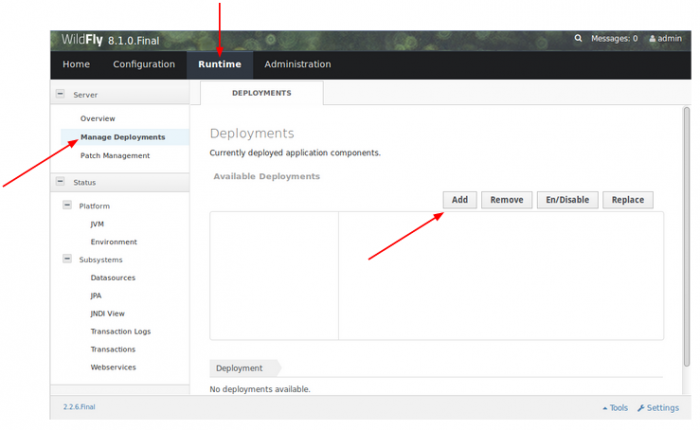
- Go to Runtime >> Server >> Manage Deployments
- Click on "Add" to deploy the MySQL driver.
You must enable the driver.
- Select the new driver
- Click on "En/Disable"
Now the driver is ready to be used.
Create datasource
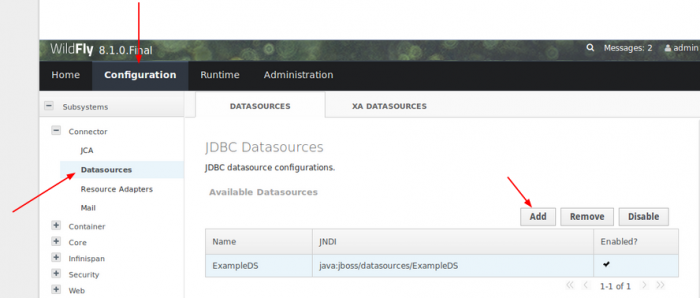
- Go to Configuration >> Datasource >> Manage Deployments
- Click on "Add" to deploy the MySQL driver.
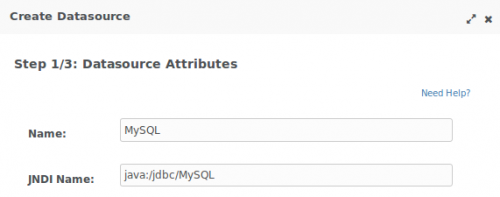
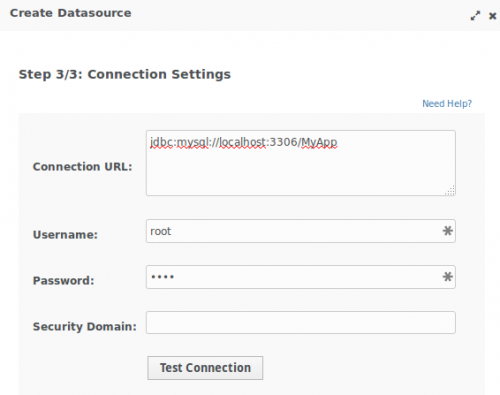
Fill up the form like this:
>> JNDI name must be: java:/jbdc/datasourceName
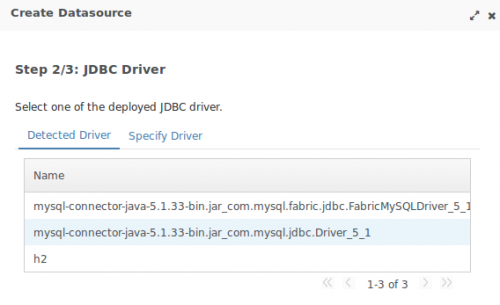
>> You must use com.mysql.jdbc.Driver_x_y
- Connection URL: jdbc:mysql://localhost:3306/AppDS
- Username: db_user
- Password: secret
Don't forget to adjust the server, database & user names.
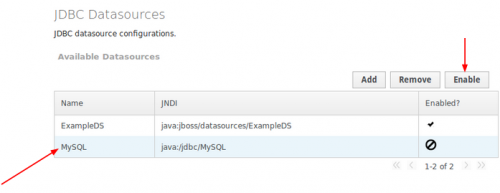
Now you can enable the datasource:
