Difference between revisions of "IntelliJ project"
(How to configure an IntelliJ project) |
|||
| (3 intermediate revisions by the same user not shown) | |||
| Line 26: | Line 26: | ||
[[File:03 project settings intelliJ.png|800px|IntelliJ import project maven settings]] | [[File:03 project settings intelliJ.png|800px|IntelliJ import project maven settings]] | ||
| + | |||
| + | |||
| + | |||
| + | |||
| + | =Project structure= | ||
| + | |||
| + | File → Project structure | ||
| + | |||
| + | |||
| + | ==Target SDK== | ||
| + | |||
| + | Choose the target SDK and compilation level. | ||
| + | |||
| + | [[File:Intellij project structure sdk.png|900px|Intellij project structure sdk]] | ||
| + | |||
| + | ''Note'': the first time you might need to add SDK by clicking the '''new''' option. | ||
| + | |||
| + | |||
| + | ==Modules and sources folders== | ||
| + | |||
| + | In IntelliJ sources, tests and resources folders are set in ''modules''. | ||
| + | |||
| + | [[File:Intellij project modules.PNG|none|Intellij project structure modules]] | ||
| + | |||
| + | You must check and set the types manually if required: | ||
| + | * src/main/java == sources | ||
| + | * src/main/resources == resources | ||
| + | * src/main/scala == sources | ||
| + | * src/test/java == test | ||
| + | * src/test/resources == test resources | ||
| + | * src/test/scala == test | ||
| + | |||
| + | |||
| + | |||
| + | |||
| + | ==Libraries, Facets, Artifacts== | ||
| + | |||
| + | Everything should be detected automatically. | ||
| + | |||
| + | For web projects, you should see the available WAR files in ''Artifacts''. | ||
| + | |||
| + | [[File:Intellij project structure artifacts.png|900px|Intellij project structure artifacts]] | ||
| + | |||
| + | >> If that it's not the case, then you need to adjust your ''web.xml'' | ||
| + | |||
| + | |||
| + | |||
| + | |||
| + | =Run configuration= | ||
| + | |||
| + | |||
| + | ==Tomcat== | ||
| + | |||
| + | To run the web-application on your Tomcat server, you need to create a ''run configuration''. | ||
| + | |||
| + | |||
| + | Run → Edit configurations... | ||
| + | * Click on the '+' button, top left | ||
| + | * Add ''Tomcat Server'' run configuration | ||
| + | |||
| + | [[File:IntelliJ tomcat project 01.png|800px|IntelliJ project run configuration]] | ||
| + | |||
| + | |||
| + | * Go to the ''Deployment'' tab | ||
| + | * Add the artifact you'd like to run by click the '+' >> Artifacts... | ||
| + | |||
| + | [[File:IntelliJ tomcat project 02.png|800px|IntelliJ project run configuration step 2]] | ||
| + | |||
| + | ♦ Note: | ||
| + | |||
| + | The WAR configuration and the ''exploded'' are exactly the same! It's just that in the WAR case you're deploying a zip archive, not in the other case. Tomcat supports both mode, even though the WAR is the official recommendation. | ||
| + | |||
| + | |||
| + | * Go to the ''Startup/Connection'' tab | ||
| + | * Add some environment variables, if required | ||
| + | |||
| + | [[File:IntelliJ tomcat project 03.png|800px|IntelliJ project run configuration step 3]] | ||
| + | |||
| + | |||
| + | You can also adjust the logs to display + save them into a file, if you'd like to. | ||
| + | |||
| + | * Go to the ''Logs'' tab | ||
| + | * Set the logs files. You can even add some logs to display by using the '+' option ! :) | ||
| + | * Set the backup console, if required. | ||
Latest revision as of 12:34, 22 November 2015
This page explains how to import a project into IntelliJ & how to configure it to run on a specific environment.
Contents
Import
- Click on 'import project'
- Choose the source directory
- Choose the project type
Maven project
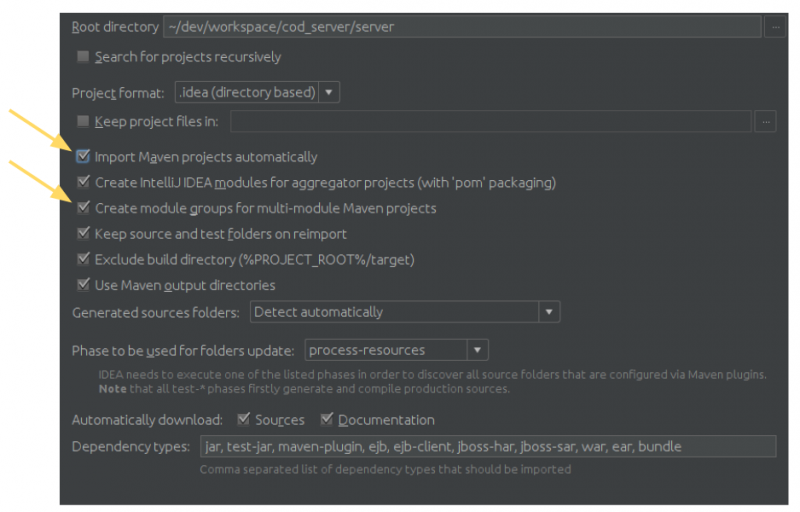
That's your best option if your project has a pom.xml
Don't forget to click:
- import Maven project automatically (so your project will always be sync)
- Create module groups for multi-maven projects
Project structure
File → Project structure
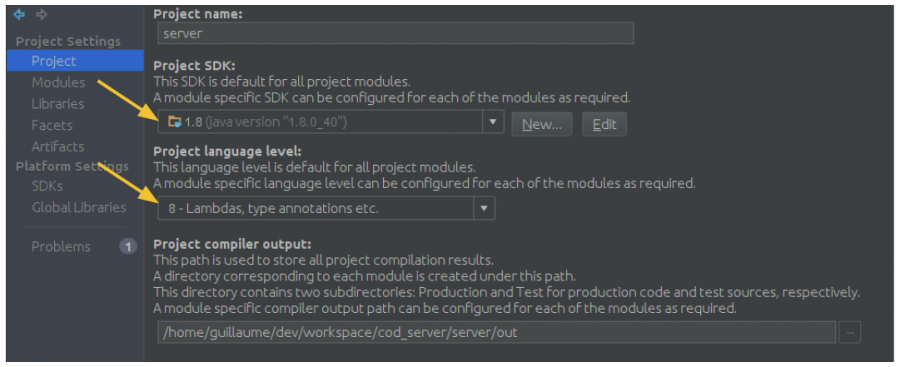
Target SDK
Choose the target SDK and compilation level.
Note: the first time you might need to add SDK by clicking the new option.
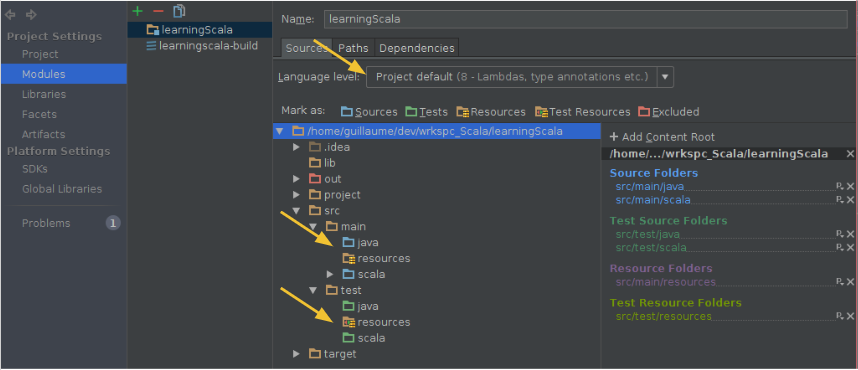
Modules and sources folders
In IntelliJ sources, tests and resources folders are set in modules.
You must check and set the types manually if required:
- src/main/java == sources
- src/main/resources == resources
- src/main/scala == sources
- src/test/java == test
- src/test/resources == test resources
- src/test/scala == test
Libraries, Facets, Artifacts
Everything should be detected automatically.
For web projects, you should see the available WAR files in Artifacts.
>> If that it's not the case, then you need to adjust your web.xml
Run configuration
Tomcat
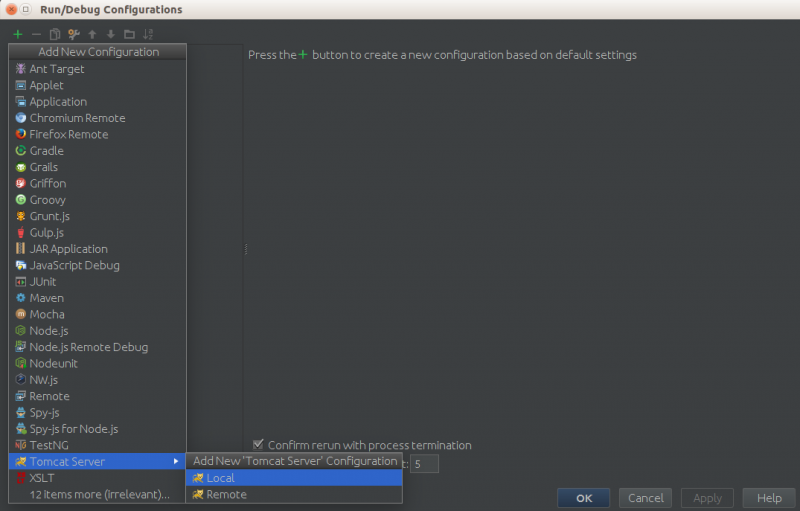
To run the web-application on your Tomcat server, you need to create a run configuration.
Run → Edit configurations...
- Click on the '+' button, top left
- Add Tomcat Server run configuration
- Go to the Deployment tab
- Add the artifact you'd like to run by click the '+' >> Artifacts...
♦ Note:
The WAR configuration and the exploded are exactly the same! It's just that in the WAR case you're deploying a zip archive, not in the other case. Tomcat supports both mode, even though the WAR is the official recommendation.
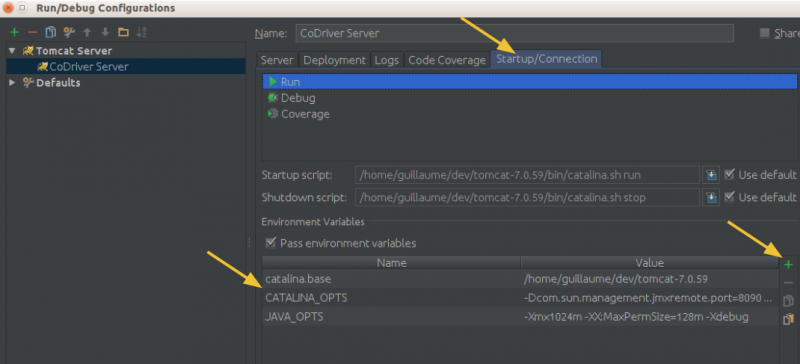
- Go to the Startup/Connection tab
- Add some environment variables, if required
You can also adjust the logs to display + save them into a file, if you'd like to.
- Go to the Logs tab
- Set the logs files. You can even add some logs to display by using the '+' option ! :)
- Set the backup console, if required.
