Difference between revisions of "Eclipse"
(→Gradle) |
|||
| (29 intermediate revisions by the same user not shown) | |||
| Line 1: | Line 1: | ||
| − | ===Installation | + | [[Category:Development]] |
| + | |||
| + | |||
| + | =Requirements= | ||
| + | |||
| + | Eclipse requires a Java JDK to work. | ||
| + | See [[JDK setup|Java JDK setup]] | ||
| + | |||
| + | |||
| + | |||
| + | =Installation= | ||
Download eclipse from the official website: http://eclipse.org/downloads/ | Download eclipse from the official website: http://eclipse.org/downloads/ | ||
| Line 5: | Line 15: | ||
Take the '''Eclipse IDE for Java EE developers''' version. | Take the '''Eclipse IDE for Java EE developers''' version. | ||
| − | |||
| − | ===== | + | ==Windows== |
| + | |||
| + | Just extract the archive and run ./eclipse/eclipse.exe | ||
| + | |||
| + | |||
| + | ==Linux== | ||
| + | |||
| + | ===Basic installation=== | ||
| + | |||
* Download the eclipse.deb package | * Download the eclipse.deb package | ||
* Install the package using: | * Install the package using: | ||
| + | |||
| + | <syntaxhighlight lang="bash"> | ||
| + | tar -xzvf eclipse.tar.gz | ||
| + | </syntaxhighlight> | ||
| + | |||
| + | * Launch application by running ./eclipse/eclipse | ||
| + | |||
| + | |||
| + | ===Create a desktop launcher=== | ||
| + | |||
| + | <syntaxhighlight lang="bash"> | ||
| + | sudo vim /usr/share/applications/eclipse.desktop | ||
| + | </syntaxhighlight> | ||
| + | |||
| + | Put the following content where ''/home/guillaume/DEV/eclipse'' is the path to Eclipse. | ||
| + | |||
| + | <syntaxhighlight lang="bash"> | ||
| + | [Desktop Entry] | ||
| + | Version=4.5.0 | ||
| + | Name=Eclipse | ||
| + | Comment=Eclipse IDE | ||
| + | Exec=/home/guillaume/Dev/eclipse/eclipse -clean | ||
| + | Icon=/home/guillaume/Dev/eclipse/icon.xpm | ||
| + | Terminal=false | ||
| + | Type=Application | ||
| + | Categories=Utility;Application | ||
| + | </syntaxhighlight> | ||
| + | |||
| + | ===Ubuntu 13.10 - launcher Fix=== | ||
| + | |||
| + | If the menu doesn't appear correctly you must create the following launcher: | ||
| + | |||
| + | <syntaxhighlight lang="bash"> | ||
| + | [Desktop Entry] | ||
| + | Version=4.3.0 | ||
| + | Name=Eclipse | ||
| + | Comment=IDE for all seasons | ||
| + | Exec=env UBUNTU_MENUPROXY=0 /home/guillaume/DEV/eclipse/eclipse -clean | ||
| + | Icon=/home/guillaume/DEV/eclipse/icon.xpm | ||
| + | Terminal=false | ||
| + | Type=Application | ||
| + | Categories=Utility;Application | ||
| + | </syntaxhighlight> | ||
| + | |||
| + | Don't forget the ''Exec=...'' line! The key is "env UBUNTU MENUPROXY=0" | ||
| + | |||
| + | |||
| + | ===Ubuntu 16.04 - launcher Fix=== | ||
| + | |||
| + | If the menu doesn't appear correctly you must create the following launcher: | ||
| + | |||
| + | <syntaxhighlight lang="bash"> | ||
| + | [Desktop Entry] | ||
| + | Version=4.6.0 | ||
| + | Name=Eclipse | ||
| + | Comment=Spring Tool Suite | ||
| + | Exec=env SWT_GTK3=0 UBUNTU_MENUPROXY=0 /mnt/temp/Dev/sts-bundle/sts-3.8.1.RELEASE/STS -clean | ||
| + | Icon=/mnt/temp/Dev/sts-bundle/sts-3.8.1.RELEASE/icon.xpm | ||
| + | Terminal=false | ||
| + | Type=Application | ||
| + | Categories=Utility;Application;Programming | ||
| + | StartupNotify=true | ||
| + | </syntaxhighlight> | ||
| + | |||
| + | Don't forget the ''Exec=...'' line! The key is "env UBUNTU MENUPROXY=0" | ||
| + | |||
| + | |||
| + | |||
| + | |||
| + | ===SWT libraries fixes=== | ||
| + | |||
| + | '''Quick fix''' | ||
| + | |||
| + | |||
| + | Edit your eclipse.ini and add the following 2 lines before <code>--launcher.appendVmargs</code> | ||
<syntaxhighlight lang="bash"> | <syntaxhighlight lang="bash"> | ||
| − | + | --launcher.GTK_version | |
| + | 2 | ||
</syntaxhighlight> | </syntaxhighlight> | ||
| − | + | Source: https://bbs.archlinux.org/viewtopic.php?id=200053 | |
| + | |||
| + | |||
| + | |||
| + | |||
| + | '''Alternate fix (old)''' | ||
| + | |||
| + | |||
| + | On the latest distribution Eclipse sometimes crashed due to libswt-*.so | ||
| + | |||
| + | To resolve that, install the development libraries: | ||
| + | |||
<syntaxhighlight lang="bash"> | <syntaxhighlight lang="bash"> | ||
| − | + | apt-get install libx11-dev libxtst-dev libgl1-mesa-dev libglu1-mesa-dev libgtk-3-dev | |
</syntaxhighlight> | </syntaxhighlight> | ||
| − | |||
| + | =Eclipse configuration= | ||
| + | |||
| + | ==Set theme== | ||
| + | |||
| + | Window menu -> Preferences -> General -> Appearance | ||
| + | > Theme | ||
| + | > ''personal'' choose: DARK | ||
| + | > Restart Eclipse | ||
| + | |||
| + | |||
| + | ==JDK== | ||
| + | |||
| + | Window menu -> Preferences -> Java -> Installed JRE | ||
| + | > Add the JDK as a standard VM | ||
| + | > JRE home = JDK root | ||
| + | > Click "Finish" | ||
| + | |||
| + | Select the new JDK as the default one | ||
| + | |||
| + | Preferences -> Java -> Installed JRE -> Execution Environment | ||
| + | > For each java version adjust the JVM to use | ||
| + | |||
| + | |||
| + | ==Display line numbers== | ||
| + | |||
| + | Window menu -> Preferences -> General -> Editors -> Text Editors | ||
| + | > Enable show line numbers | ||
| + | > show print margin (you can adjust the size. I'm using "160") | ||
| + | |||
| + | |||
| + | ==Set spaces for tab== | ||
| + | |||
| + | I recommend you to use spaces instead of tab, this way the source code will always look the same on all platforms. | ||
| + | |||
| + | Window menu -> Preferences -> General -> Editors -> Text Editors | ||
| + | > Insert spaces for tabs (tab width = 4) | ||
| + | |||
| + | |||
| + | ==Increase console size== | ||
| + | |||
| + | Window menu -> Preferences -> Run / debug -> Console | ||
| + | |||
| + | If you limit the console output put a hudge value (>= 100 000) | ||
| + | |||
| + | |||
| + | ==Adjust encoding to UTF-8== | ||
| + | |||
| + | By default Eclipse use the same encoding as your O.S, which is probably ISO-8859-1 .You should instead use UTF-8. | ||
| + | |||
| + | >> '''This is VERY important if you're not all using the same O.S ; or if production is different than development''' | ||
| + | |||
| + | Window menu -> Preferences -> General -> Workspace | ||
| + | |||
| + | At the bottom of the script, choose "UTF-8" | ||
| + | [[File:Eclipse utf8 encoding 1.png|none|Eclipse UTF-8 encoding(1)]] | ||
| + | |||
| + | Window menu -> Preferences -> General -> Editors -> Text Editors -> Spelling | ||
| + | |||
| + | Choose UTF-8 to encode javadoc | ||
| + | [[File:Eclipse utf8 encoding 2.png|none|Eclipse UTF-8 encoding(2)]] | ||
| + | |||
| + | Window menu -> Preferences -> General -> filter "encoding" | ||
| + | |||
| + | Encode CSS + HTML + JSP + XML in UTF-8 | ||
| + | [[File:Eclipse utf8 encoding 3.png|none|Eclipse UTF-8 encoding(3)]] | ||
| + | |||
| + | On the General -> Content Types, check that everything has default encoding: UTF-8. | ||
| + | If the default encoding is blank, then add "UTF-8" | ||
| + | |||
| + | Check: | ||
| + | * Android Binary XML (if available) | ||
| + | * Diagram (if available) | ||
| + | * JAR Content | ||
| + | * Java class File | ||
| + | * Text | ||
| + | ** HTML | ||
| + | ** Java properties file | ||
| + | ** JSP | ||
| + | *** CSS JSP | ||
| + | *** JSP fragment | ||
| + | *** JSP Tag definition | ||
| + | ** XML | ||
| + | |||
| + | |||
| + | ==Code formatting== | ||
| + | |||
| + | You can download the Google formatter from here: https://github.com/google/styleguide | ||
| + | |||
| + | Details http://google.github.io/styleguide/javaguide.html | ||
| + | |||
| + | |||
| + | Installing the coding style settings | ||
| + | * Intellij | ||
| + | ** Download the [https://github.com/google/styleguide/blob/gh-pages/intellij-java-google-style.xml intellij-java-google-style.xml] | ||
| + | ** Copy it into your config -> codestyles folder in your IntelliJ settings folder | ||
| + | ** Under Settings -> Code Style -> select google-styleguide as current code style for the metanome project. | ||
| + | * Eclipse | ||
| + | ** Download the [https://github.com/google/styleguide/blob/gh-pages/eclipse-java-google-style.xml eclipse-java-google-style.xml] | ||
| + | ** Under Window -> Preferences -> Java -> Code Style -> Formatter. | ||
| + | ** Import the settings file by selecting Import. | ||
| + | |||
| + | |||
| + | ===Import formatter=== | ||
| + | |||
| + | Window menu -> Preferences -> Java -> Code style -> Formatter | ||
| + | > Import formatter | ||
| + | |||
| + | [[File:eclipse_formatter.png|none|Eclipse formatter]] | ||
| + | |||
| + | ===Save actions=== | ||
| + | |||
| + | Before saving a java file, you can perform some "save actions", that will result in automatic formatting. | ||
| + | |||
| + | Window menu -> Preferences -> Java -> Editor -> Save Actions | ||
| + | Enable Perform the selected actions on save: | ||
| + | [[File:eclipse_save_actions.png|none|Eclipse save actions]] | ||
| + | |||
| + | Check: | ||
| + | * Perform save actions | ||
| + | ** Format source code | ||
| + | *** format ALL lines | ||
| + | ** Organize imports | ||
| + | ** Additional actions | ||
| + | |||
| + | ... Configure additional actions: | ||
| + | *Code organizing | ||
| + | *Remove trailing whitespace (all lines) | ||
| + | *Correct indentation | ||
| + | *Sort members | ||
| + | *Code style | ||
| + | **Use block in if/while/for/do statements (always) | ||
| + | **Use modifer "final" where possible (parameter) | ||
| + | *Missing code | ||
| + | **Select all | ||
| + | *Unnecessary code | ||
| + | **Remove unused imports | ||
| + | **Remove unnecessary casts + '$NON-NLS' tags | ||
| + | |||
| + | =Eclipse plug-ins= | ||
| + | |||
| + | Eclipse marketplace: http://marketplace.eclipse.org/ | ||
| + | |||
| + | |||
| + | ==Maven== | ||
| + | Plugins installation and configuration | ||
| + | |||
| + | |||
| + | ===Maven plugin settings=== | ||
| + | Window menu -> Preferences -> Maven | ||
| + | |||
| + | Enable: | ||
| + | *download artifact sources | ||
| + | *download artifact javadoc | ||
| + | |||
| + | Window menu -> Preferences -> Maven -> Installation | ||
| + | > Add the path to your own MAVEN 3 installation | ||
| + | |||
| + | Window menu -> Preferences -> Maven -> User Interface | ||
| + | >Open XML page in the POM editor by default [VERY important for performances] | ||
| + | |||
| + | Window menu -> Preferences -> Maven -> User Settings | ||
| + | * Choose the correct settings.xml (the one from your Maven installation instead of ~/.m2/) | ||
| + | * Set the repository path | ||
| + | |||
| + | |||
| + | ===Run configurations=== | ||
| + | You can run MAVEN from Eclipse thanks to the run configurations. | ||
| + | |||
| + | Run menu -> Run Configurations -> Maven Build -> [Double click on it] | ||
| + | |||
| + | Create a new run configuration for each maven sequence. | ||
| + | *Configuration (1) | ||
| + | **Name: Maven clean install | ||
| + | **Base directory: ${project_loc} | ||
| + | **Goals: clean install | ||
| + | |||
| + | *Configuration (2) # | ||
| + | **Name: Maven clean install -DskipTests | ||
| + | **Base directory: ${project_loc} | ||
| + | **Goals: clean install | ||
| + | **Options: select "Skip Tests" | ||
| + | |||
| + | |||
| + | Add run configurations to favorite | ||
| + | |||
| + | Click on the arrow of the RUN button (left side) -> Organize favorites | ||
| + | [[File:Eclipse_Run_configurations.png|none|Eclipse run command]] | ||
| + | |||
| + | Click "ADD" > Select your configurations | ||
| + | Now, you can run your configurations by using the same button. | ||
| + | |||
| + | |||
| + | ==Gradle== | ||
| + | |||
| + | * '''STS''' : Install "Buildship" | ||
| + | |||
| + | See https://marketplace.eclipse.org/content/buildship-gradle-integration | ||
| + | |||
| + | |||
| + | |||
| + | ===Configuration=== | ||
| + | |||
| + | Gradle > Set '''Gradle distribution''' ''folder'' + enable ''Remap''s and ''Use custom Tooling Model'' | ||
| + | |||
| + | ==GitHub markdown viewer== | ||
| + | |||
| + | To view your GitHub README content you might want to install "GitHub Flavored Markdown viewer plugin" | ||
| + | |||
| + | http://marketplace.eclipse.org/content/github-flavored-markdown-viewer-plugin | ||
| + | |||
| + | |||
| + | Then you can see your file content by right clicking README.md > ''Show in GFM view'' | ||
| + | |||
| + | |||
| + | |||
| + | ==Checkstyle== | ||
| + | |||
| + | |||
| + | ===Installation=== | ||
| + | Checkstyle Plug-in | ||
| + | > Update site: http://eclipse-cs.sourceforge.net/update/ | ||
| + | |||
| + | Install: | ||
| + | * Eclipse checkstyle plug-in | ||
| + | * All additional checks | ||
| + | |||
| + | |||
| + | ===Configuration=== | ||
| + | Window menu -> Preferences -> Checkstyle | ||
| + | [[File:Eclipse_checkstyle.png|none|Eclipse checkstyle]] | ||
| + | |||
| + | You can either: | ||
| + | * Import your own checkstyle set of rule (new -> external configuration file -> browse to your own checkstyle -> set it as default) | ||
| + | * Set the "Sun Check (Eclipse)" as default. | ||
| + | * Duplicate the "Sun Check (Eclipse)" + make your own arrangements and use it as default | ||
| + | |||
| + | |||
| + | -- hint: -- | ||
| + | I strongly advised you to commit your formatter.xml; checkstyle.xml; code_templates.xml; cleanup.xml into your SVN project. | ||
| + | |||
| + | |||
| + | ===Usage=== | ||
| + | You have to enable / disable checkstyle for each one of your projects. | ||
| + | > Right click on a project -> Properties -> Checkstyle -> Enable checkstyle for this project | ||
| + | |||
| + | You have to open the "Window menu -> Show view -> Others... -> Checkstyle -> Checkstyle violations" to get the analyze results | ||
| + | |||
| + | |||
| + | ==Eclipse Emma Code Coverage== | ||
| + | !! This is a very useful tool that compute the code coverage for jUnit tests (unit & integrations tests) !! :-) | ||
| + | |||
| + | '''Installation''' | ||
| + | > Update site : http://update.eclemma.org/ | ||
| + | |||
| + | '''Configuration''' | ||
| + | |||
| + | 1. Just Right click on your test folder / test class -> Coverage as... -> jUnit test | ||
| + | |||
| + | 2. You have to open the "Window menu -> Show view -> Java -> "Coverage" to get the analyze results | ||
| + | |||
| + | |||
| + | ==Java Decompiler== | ||
| + | The most famous java decompiler: JADclipse. | ||
| + | > Update site: http://jadclipse.sf.net/update | ||
| + | |||
| + | |||
| + | |||
| + | ==FindBugs== | ||
| + | |||
| + | FindBugs helps you to detect strange code patterns. | ||
| + | |||
| + | * Official website: https://marketplace.eclipse.org/content/findbugs-eclipse-plugin | ||
| + | |||
| + | |||
| + | To use it, just right click on your project > find Bugs > find bugs | ||
| + | |||
| + | |||
| + | ==SonarQube== | ||
| + | |||
| + | If you want to enjoy the SONAR reports within Eclipse you can install the SonarQube plugin. | ||
| + | |||
| + | * Official website: http://docs.sonarqube.org/display/SONAR/Installing+SonarQube+in+Eclipse | ||
| + | * Update website: http://downloads.sonarsource.com/eclipse/eclipse | ||
| + | |||
| + | |||
| + | |||
| + | ==SVN Subclipse== | ||
| + | The SVN subclipse exists in many version. You have to select your version accordingly to your SVN server (v1.6, v1.7, v1.8 ...) | ||
| + | |||
| + | |||
| + | ===Installation=== | ||
| + | Update site: | ||
| + | * SVN 1.7 = http://subclipse.tigris.org/update_1.8.x | ||
| + | * SVN 1.8 = http://subclipse.tigris.org/update_1.10.x | ||
| + | * SVN 1.9 = http://subclipse.tigris.org/update_1.12.x | ||
| + | |||
| + | Install: | ||
| + | *Subclipse | ||
| + | **Subclipse (required) | ||
| + | **Subclipse integration for Mylyn 3.x | ||
| + | **Subversion client adapter | ||
| + | **Subversion JavaHL Native Library adapter | ||
| + | **Subversion revision graph | ||
| + | |||
| + | The CollabNet is also very useful to branch and merges branch > trunk ! :) | ||
| + | ** CollabNet - collaboration Merge client | ||
| − | === | + | ===Linux # JavaHL for Subclipse=== |
| − | Source: | + | Source: http://subclipse.tigris.org/wiki/JavaHL Subclipse JavaHL wiki |
Linux requires the JavaHL client for Subclipse: | Linux requires the JavaHL client for Subclipse: | ||
| Line 54: | Line 463: | ||
| − | ===== | + | |
| + | ==GIT client== | ||
| + | |||
| + | Install the GIT client & its console: | ||
| + | |||
| + | * http://marketplace.eclipse.org/content/egit-git-team-provider | ||
| + | * http://marketplace.eclipse.org/content/gonsole | ||
| + | |||
| + | |||
| + | |||
| + | ==Infinite test (infinitest)== | ||
| + | Source: http://infinitest.github.io/ | ||
| + | |||
| + | |||
| + | ===Installation=== | ||
| + | Update site: http://infinitest.github.io | ||
| + | |||
| + | Just install the plugin and restart. | ||
| + | |||
| + | Then you have to enable the plugin in Window -> Preferences -> infinitest | ||
| + | [[File:Infinitest_config.png|none|Infinitest configuration]] | ||
| + | |||
| + | |||
| + | Then it should run all your tests. :) | ||
| + | |||
| + | |||
| + | ===Test filter=== | ||
| + | You can add some filters by adding the following "infinitest.filters" at the root. Example: | ||
| + | [[File:Infinitest_filter.png|none|Infinitest filter]] | ||
| + | |||
| + | |||
| + | File name: | ||
<syntaxhighlight lang="bash"> | <syntaxhighlight lang="bash"> | ||
| − | + | infinitest.filters | |
</syntaxhighlight> | </syntaxhighlight> | ||
| − | + | ||
| + | File content: | ||
<syntaxhighlight lang="bash"> | <syntaxhighlight lang="bash"> | ||
| − | + | .*IT | |
| − | |||
| − | |||
| − | |||
| − | |||
| − | |||
| − | |||
| − | |||
| − | |||
</syntaxhighlight> | </syntaxhighlight> | ||
| − | == | + | ==E(fx)clipse== |
| − | ======= | + | e(fx)clipse is a super nice plugin to develop in JavaFX 2! |
| − | !!! | + | * Plugin website: https://marketplace.eclipse.org/content/efxclipse/ |
| − | + | ||
| − | + | ||
| − | + | You need to install Oracle Java FX UI builder as well. | |
| − | + | ||
| − | + | ♦♠ Since JDK 8.40 Oracle does NOT ship JavaFX UI Scene Builder !! :O... Only the source code. Thanks to the community, you can '''download Scene builder from Gluon''' on http://gluonhq.com/products/scene-builder/ | |
| − | + | ||
| − | + | ||
| − | + | ||
| − | + | ==JBoss tools (Wildfly, etc.)== | |
| − | + | ||
| − | + | Download and install a local server. see [[Wildfly]] | |
| − | + | ||
| + | |||
| + | |||
| + | ===Installation=== | ||
| + | Go to the official website to get the latest plugin for your Eclipse version: http://tools.jboss.org/downloads/jbosstools/ | ||
| + | |||
| + | * Just drag and drop the "Eclipse installation" icon. | ||
| + | * Install all the proposed elements. See http://planet.jboss.org/post/getting_started_with_jboss_tools_and_wildfly_tech_tip_5 | ||
| + | |||
| + | |||
| + | |||
| + | ===Global configuration=== | ||
| + | Window menu -> Preferences -> Server -> Runtime environments | ||
| + | |||
| + | # Screen 1 | ||
| + | *Add > JBoss community > Wildfly 8.x Runtime | ||
| + | *Click next | ||
| + | |||
| + | # Screen 2 | ||
| + | *Choose the server folder | ||
| + | |||
| + | # Screen 3 | ||
| + | *Admin name: admin | ||
| + | *Admin pwd: admin | ||
| + | *As this is a dev environment do not preserve sessions accross redeployment | ||
| + | |||
| + | |||
| + | Ports: | ||
| + | * 8080 for applications | ||
| + | * 9990 for management | ||
| + | |||
| + | |||
| + | |||
| + | |||
| + | ==Oracle tools (Glassfish, etc.)== | ||
| + | |||
| + | Download and install a local server, see [[Glassfish]] | ||
| + | |||
| + | |||
| + | ===Installation=== | ||
| + | Update site: http://download.oracle.com/otn_software/oepe/luna | ||
| + | |||
| + | !!! Don't forget to adjust the URL for your specific Eclipse version !!! | ||
| + | * kepler = Eclipse 4.3 | ||
| + | * luna = Eclipse 4.4 | ||
| + | |||
| + | |||
| + | Install: | ||
| + | * Glassfish tools | ||
| + | * Java EE 7 documentation | ||
| + | * Oracle Java EE tools | ||
| + | |||
| + | |||
| + | ===Global configuration=== | ||
| + | Window menu -> Preferences -> Server -> Runtime environments | ||
| + | |||
| + | # Screen 1 | ||
| + | *Add > Glassfish > server version (4.0) | ||
| + | *Check the "create a new local server" option | ||
| + | *Click next | ||
| + | |||
| + | # Screen 2 | ||
| + | *Choose the server folder > Glassfish4/glassfish | ||
| + | |||
| + | # Screen 3 | ||
| + | *Admin name: admin | ||
| + | *Admin pwd: admin | ||
| + | *As this is a dev environment do not preserve sessions accross redeployment | ||
| + | |||
| + | ===Server configuration=== | ||
| + | Open the view Server -> Double click on your Glassfish server | ||
| + | |||
| + | Under Publishing, select "never publish automatically" | ||
| + | |||
| + | |||
| + | |||
| + | |||
| + | |||
| + | =Improvements= | ||
| + | |||
| + | ==Eclipse Color themes== | ||
| + | > Update site: http://eclipse-color-theme.github.com/update | ||
| + | |||
| + | |||
| + | Configuration | ||
| + | Window menu -> Preferences -> General -> Appareance -> Color Theme | ||
| + | |||
| + | You can choose a theme and / or import a new one. | ||
| + | *To intelliJ users: the dracula theme is available on Eclipse. | ||
| + | |||
| + | |||
| + | Get more themes | ||
| + | |||
| + | You can download Eclipse theme from the official website: http://eclipsecolorthemes.org/ | ||
| − | |||
| + | ==Copy workspace settings== | ||
| + | To copy Eclipse settings into a new workspace: | ||
| − | == | + | Copy the .metadata/.plugins/org.eclipse.core.runtime/.settings directory into your new workspace directory. |
| − | + | ||
| + | |||
| + | ==Avoid commit Eclipse files== | ||
| + | You can avoid commit of non-useful files, just update the global SVN ignore. | ||
| + | |||
| + | Window menu -> Preferences -> Team -> Ignored Resources | ||
| − | + | Add patterns: | |
| − | + | * "target" | |
| − | + | * ".settings" | |
| − | + | * ".project" | |
| + | * ".classpath" | ||
| + | * ".checkstyle" | ||
Latest revision as of 21:06, 30 September 2016
Contents
- 1 Requirements
- 2 Installation
- 3 Eclipse configuration
- 4 Eclipse plug-ins
- 5 Improvements
Requirements
Eclipse requires a Java JDK to work. See Java JDK setup
Installation
Download eclipse from the official website: http://eclipse.org/downloads/
Take the Eclipse IDE for Java EE developers version.
Windows
Just extract the archive and run ./eclipse/eclipse.exe
Linux
Basic installation
- Download the eclipse.deb package
- Install the package using:
tar -xzvf eclipse.tar.gz- Launch application by running ./eclipse/eclipse
Create a desktop launcher
sudo vim /usr/share/applications/eclipse.desktopPut the following content where /home/guillaume/DEV/eclipse is the path to Eclipse.
[Desktop Entry]
Version=4.5.0
Name=Eclipse
Comment=Eclipse IDE
Exec=/home/guillaume/Dev/eclipse/eclipse -clean
Icon=/home/guillaume/Dev/eclipse/icon.xpm
Terminal=false
Type=Application
Categories=Utility;Application
Ubuntu 13.10 - launcher Fix
If the menu doesn't appear correctly you must create the following launcher:
[Desktop Entry]
Version=4.3.0
Name=Eclipse
Comment=IDE for all seasons
Exec=env UBUNTU_MENUPROXY=0 /home/guillaume/DEV/eclipse/eclipse -clean
Icon=/home/guillaume/DEV/eclipse/icon.xpm
Terminal=false
Type=Application
Categories=Utility;Application
Don't forget the Exec=... line! The key is "env UBUNTU MENUPROXY=0"
Ubuntu 16.04 - launcher Fix
If the menu doesn't appear correctly you must create the following launcher:
[Desktop Entry]
Version=4.6.0
Name=Eclipse
Comment=Spring Tool Suite
Exec=env SWT_GTK3=0 UBUNTU_MENUPROXY=0 /mnt/temp/Dev/sts-bundle/sts-3.8.1.RELEASE/STS -clean
Icon=/mnt/temp/Dev/sts-bundle/sts-3.8.1.RELEASE/icon.xpm
Terminal=false
Type=Application
Categories=Utility;Application;Programming
StartupNotify=true
Don't forget the Exec=... line! The key is "env UBUNTU MENUPROXY=0"
SWT libraries fixes
Quick fix
Edit your eclipse.ini and add the following 2 lines before --launcher.appendVmargs
--launcher.GTK_version
2
Source: https://bbs.archlinux.org/viewtopic.php?id=200053
Alternate fix (old)
On the latest distribution Eclipse sometimes crashed due to libswt-*.so
To resolve that, install the development libraries:
apt-get install libx11-dev libxtst-dev libgl1-mesa-dev libglu1-mesa-dev libgtk-3-dev
Eclipse configuration
Set theme
Window menu -> Preferences -> General -> Appearance
    > Theme
    > personal choose: DARK
    > Restart Eclipse
JDK
Window menu -> Preferences -> Java -> Installed JRE
    > Add the JDK as a standard VM
    > JRE home = JDK root
    > Click "Finish"
Select the new JDK as the default one
Preferences -> Java -> Installed JRE -> Execution Environment
> For each java version adjust the JVM to use
Display line numbers
Window menu -> Preferences -> General -> Editors -> Text Editors
    > Enable show line numbers
    > show print margin (you can adjust the size. I'm using "160")
Set spaces for tab
I recommend you to use spaces instead of tab, this way the source code will always look the same on all platforms.
Window menu -> Preferences -> General -> Editors -> Text Editors
> Insert spaces for tabs (tab width = 4)
Increase console size
Window menu -> Preferences -> Run / debug -> Console
If you limit the console output put a hudge value (>= 100 000)
Adjust encoding to UTF-8
By default Eclipse use the same encoding as your O.S, which is probably ISO-8859-1 .You should instead use UTF-8.
>> This is VERY important if you're not all using the same O.S ; or if production is different than development
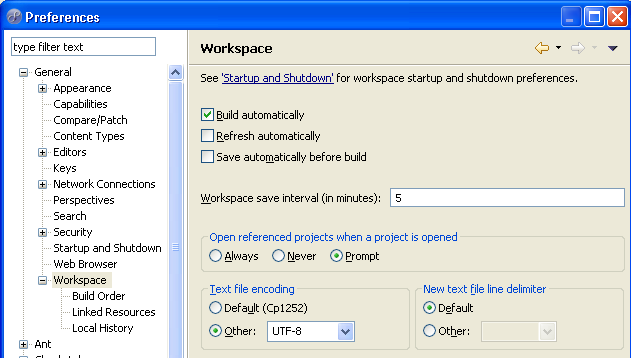
Window menu -> Preferences -> General -> Workspace
At the bottom of the script, choose "UTF-8"
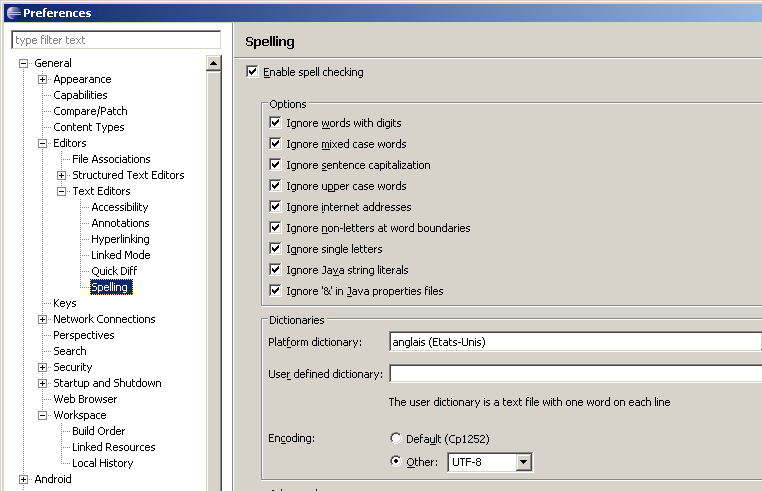
Window menu -> Preferences -> General -> Editors -> Text Editors -> Spelling
Choose UTF-8 to encode javadoc
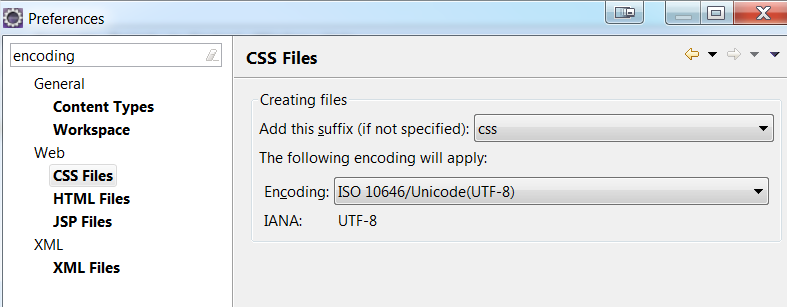
Window menu -> Preferences -> General -> filter "encoding"
Encode CSS + HTML + JSP + XML in UTF-8
On the General -> Content Types, check that everything has default encoding: UTF-8. If the default encoding is blank, then add "UTF-8"
Check:
- Android Binary XML (if available)
- Diagram (if available)
- JAR Content
- Java class File
- Text
- HTML
- Java properties file
- JSP
- CSS JSP
- JSP fragment
- JSP Tag definition
- XML
Code formatting
You can download the Google formatter from here: https://github.com/google/styleguide
Details http://google.github.io/styleguide/javaguide.html
Installing the coding style settings
- Intellij
- Download the intellij-java-google-style.xml
- Copy it into your config -> codestyles folder in your IntelliJ settings folder
- Under Settings -> Code Style -> select google-styleguide as current code style for the metanome project.
- Eclipse
- Download the eclipse-java-google-style.xml
- Under Window -> Preferences -> Java -> Code Style -> Formatter.
- Import the settings file by selecting Import.
Import formatter
Window menu -> Preferences -> Java -> Code style -> Formatter
> Import formatter
Save actions
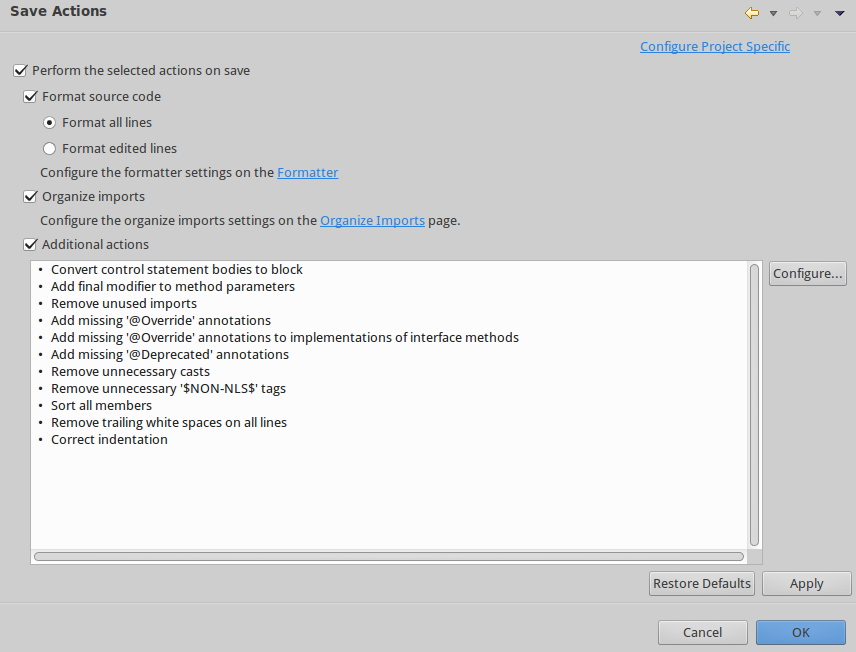
Before saving a java file, you can perform some "save actions", that will result in automatic formatting.
Window menu -> Preferences -> Java -> Editor -> Save Actions Enable Perform the selected actions on save:
Check:
- Perform save actions
- Format source code
- format ALL lines
- Organize imports
- Additional actions
- Format source code
... Configure additional actions:
- Code organizing
- Remove trailing whitespace (all lines)
- Correct indentation
- Sort members
- Code style
- Use block in if/while/for/do statements (always)
- Use modifer "final" where possible (parameter)
- Missing code
- Select all
- Unnecessary code
- Remove unused imports
- Remove unnecessary casts + '$NON-NLS' tags
Eclipse plug-ins
Eclipse marketplace: http://marketplace.eclipse.org/
Maven
Plugins installation and configuration
Maven plugin settings
Window menu -> Preferences -> Maven
Enable:
- download artifact sources
- download artifact javadoc
Window menu -> Preferences -> Maven -> Installation
> Add the path to your own MAVEN 3 installation
Window menu -> Preferences -> Maven -> User Interface
>Open XML page in the POM editor by default [VERY important for performances]
Window menu -> Preferences -> Maven -> User Settings
- Choose the correct settings.xml (the one from your Maven installation instead of ~/.m2/)
- Set the repository path
Run configurations
You can run MAVEN from Eclipse thanks to the run configurations.
Run menu -> Run Configurations -> Maven Build -> [Double click on it]
Create a new run configuration for each maven sequence.
- Configuration (1)
- Name: Maven clean install
- Base directory: ${project_loc}
- Goals: clean install
- Configuration (2) #
- Name: Maven clean install -DskipTests
- Base directory: ${project_loc}
- Goals: clean install
- Options: select "Skip Tests"
Add run configurations to favorite
Click on the arrow of the RUN button (left side) -> Organize favorites
Click "ADD" > Select your configurations Now, you can run your configurations by using the same button.
Gradle
- STS : Install "Buildship"
See https://marketplace.eclipse.org/content/buildship-gradle-integration
Configuration
Gradle > Set Gradle distribution folder + enable Remaps and Use custom Tooling Model
GitHub markdown viewer
To view your GitHub README content you might want to install "GitHub Flavored Markdown viewer plugin"
http://marketplace.eclipse.org/content/github-flavored-markdown-viewer-plugin
Then you can see your file content by right clicking README.md > Show in GFM view
Checkstyle
Installation
Checkstyle Plug-in
> Update site: http://eclipse-cs.sourceforge.net/update/
Install:
- Eclipse checkstyle plug-in
- All additional checks
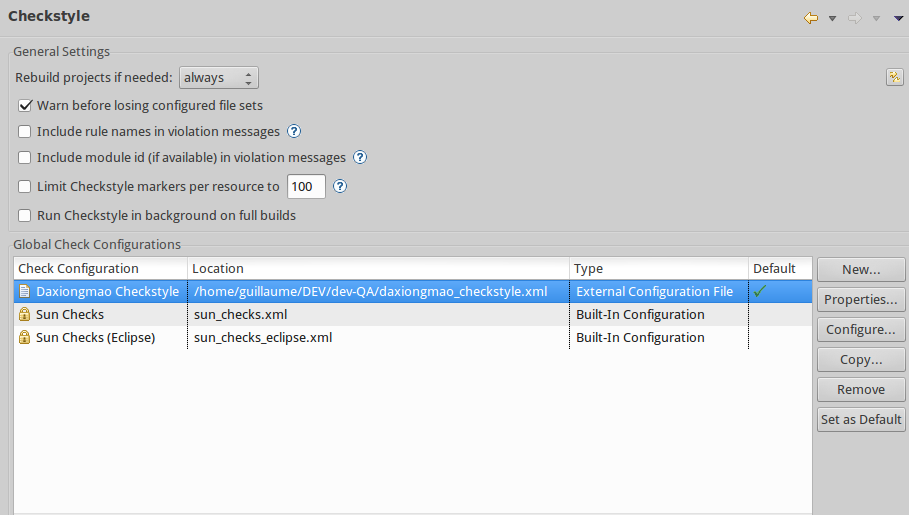
Configuration
Window menu -> Preferences -> Checkstyle
You can either:
- Import your own checkstyle set of rule (new -> external configuration file -> browse to your own checkstyle -> set it as default)
- Set the "Sun Check (Eclipse)" as default.
- Duplicate the "Sun Check (Eclipse)" + make your own arrangements and use it as default
-- hint: --
I strongly advised you to commit your formatter.xml; checkstyle.xml; code_templates.xml; cleanup.xml into your SVN project.
Usage
You have to enable / disable checkstyle for each one of your projects.
> Right click on a project -> Properties -> Checkstyle -> Enable checkstyle for this project
You have to open the "Window menu -> Show view -> Others... -> Checkstyle -> Checkstyle violations" to get the analyze results
Eclipse Emma Code Coverage
!! This is a very useful tool that compute the code coverage for jUnit tests (unit & integrations tests) !! :-)
Installation
> Update site : http://update.eclemma.org/
Configuration
1. Just Right click on your test folder / test class -> Coverage as... -> jUnit test
2. You have to open the "Window menu -> Show view -> Java -> "Coverage" to get the analyze results
Java Decompiler
The most famous java decompiler: JADclipse.
> Update site: http://jadclipse.sf.net/update
FindBugs
FindBugs helps you to detect strange code patterns.
- Official website: https://marketplace.eclipse.org/content/findbugs-eclipse-plugin
To use it, just right click on your project > find Bugs > find bugs
SonarQube
If you want to enjoy the SONAR reports within Eclipse you can install the SonarQube plugin.
- Official website: http://docs.sonarqube.org/display/SONAR/Installing+SonarQube+in+Eclipse
- Update website: http://downloads.sonarsource.com/eclipse/eclipse
SVN Subclipse
The SVN subclipse exists in many version. You have to select your version accordingly to your SVN server (v1.6, v1.7, v1.8 ...)
Installation
Update site:
- SVN 1.7 = http://subclipse.tigris.org/update_1.8.x
- SVN 1.8 = http://subclipse.tigris.org/update_1.10.x
- SVN 1.9 = http://subclipse.tigris.org/update_1.12.x
Install:
- Subclipse
- Subclipse (required)
- Subclipse integration for Mylyn 3.x
- Subversion client adapter
- Subversion JavaHL Native Library adapter
- Subversion revision graph
The CollabNet is also very useful to branch and merges branch > trunk ! :)
- CollabNet - collaboration Merge client
Linux # JavaHL for Subclipse
Source: http://subclipse.tigris.org/wiki/JavaHL Subclipse JavaHL wiki
Linux requires the JavaHL client for Subclipse:
sudo apt-get install libsvn-javaFind the library file:
sudo find / -name libsvnjavahl-1.soYou should have something like:
guillaume@VC076:~/DEV/eclipse$ sudo find / -name libsvnjavahl-1.so
/usr/lib/x86_64-linux-gnu/jni/libsvnjavahl-1.so
Now, update your eclipse.ini configuration
vim eclipse.iniAdd the path without '/' at the end.
-vmargs
-Djava.library.path=/usr/lib/x86_64-linux-gnu/jni
→ Note: Ubuntu 13.10 as only the JavaHL 1.7 library. So you should not install SVN client 1.8.x but SVN client 1.7.x !!
GIT client
Install the GIT client & its console:
- http://marketplace.eclipse.org/content/egit-git-team-provider
- http://marketplace.eclipse.org/content/gonsole
Infinite test (infinitest)
Source: http://infinitest.github.io/
Installation
Update site: http://infinitest.github.io
Just install the plugin and restart.
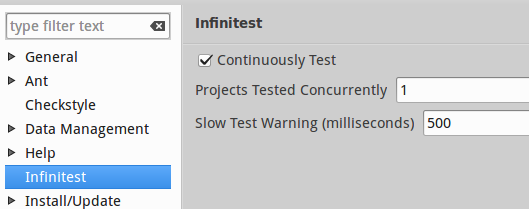
Then you have to enable the plugin in Window -> Preferences -> infinitest
Then it should run all your tests. :)
Test filter
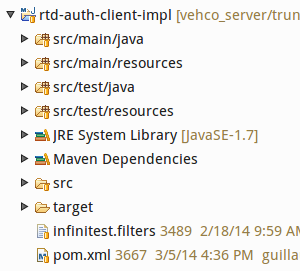
You can add some filters by adding the following "infinitest.filters" at the root. Example:
File name:
infinitest.filters
File content:
.*IT
E(fx)clipse
e(fx)clipse is a super nice plugin to develop in JavaFX 2!
- Plugin website: https://marketplace.eclipse.org/content/efxclipse/
You need to install Oracle Java FX UI builder as well.
♦♠ Since JDK 8.40 Oracle does NOT ship JavaFX UI Scene Builder !! :O... Only the source code. Thanks to the community, you can download Scene builder from Gluon on http://gluonhq.com/products/scene-builder/
JBoss tools (Wildfly, etc.)
Download and install a local server. see Wildfly
Installation
Go to the official website to get the latest plugin for your Eclipse version: http://tools.jboss.org/downloads/jbosstools/
- Just drag and drop the "Eclipse installation" icon.
- Install all the proposed elements. See http://planet.jboss.org/post/getting_started_with_jboss_tools_and_wildfly_tech_tip_5
Global configuration
Window menu -> Preferences -> Server -> Runtime environments
- Screen 1
- Add > JBoss community > Wildfly 8.x Runtime
- Click next
- Screen 2
- Choose the server folder
- Screen 3
- Admin name: admin
- Admin pwd: admin
- As this is a dev environment do not preserve sessions accross redeployment
Ports:
- 8080 for applications
- 9990 for management
Oracle tools (Glassfish, etc.)
Download and install a local server, see Glassfish
Installation
Update site: http://download.oracle.com/otn_software/oepe/luna
!!! Don't forget to adjust the URL for your specific Eclipse version !!!
- kepler = Eclipse 4.3
- luna = Eclipse 4.4
Install:
- Glassfish tools
- Java EE 7 documentation
- Oracle Java EE tools
Global configuration
Window menu -> Preferences -> Server -> Runtime environments
- Screen 1
- Add > Glassfish > server version (4.0)
- Check the "create a new local server" option
- Click next
- Screen 2
- Choose the server folder > Glassfish4/glassfish
- Screen 3
- Admin name: admin
- Admin pwd: admin
- As this is a dev environment do not preserve sessions accross redeployment
Server configuration
Open the view Server -> Double click on your Glassfish server
Under Publishing, select "never publish automatically"
Improvements
Eclipse Color themes
> Update site: http://eclipse-color-theme.github.com/update
Configuration Window menu -> Preferences -> General -> Appareance -> Color Theme
You can choose a theme and / or import a new one.
- To intelliJ users: the dracula theme is available on Eclipse.
Get more themes
You can download Eclipse theme from the official website: http://eclipsecolorthemes.org/
Copy workspace settings
To copy Eclipse settings into a new workspace:
Copy the .metadata/.plugins/org.eclipse.core.runtime/.settings directory into your new workspace directory.
Avoid commit Eclipse files
You can avoid commit of non-useful files, just update the global SVN ignore.
Window menu -> Preferences -> Team -> Ignored Resources
Add patterns:
- "target"
- ".settings"
- ".project"
- ".classpath"
- ".checkstyle"
